This is my first tutorial! My main goal with this tutorial is to give you some tips on how to use your Studio software for Silhouette to make a shirt very easily. These aren't monumental tips, however, they took me a while to figure out when I first got my Cameo and I would have loved to have had this information during some frustrating moments! So here's what I came up with!
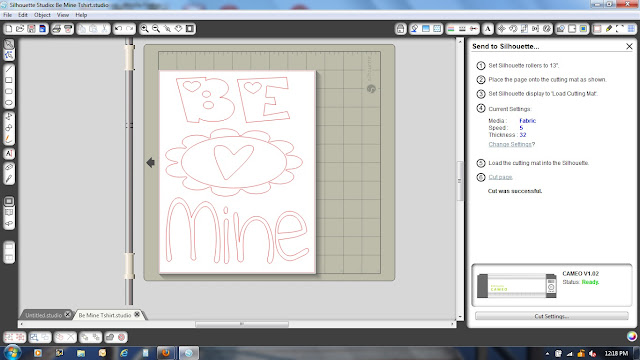
Design your t-shirt with your Studio software. I wanted to make my daughter's some cute Valentine's Day t-shirts to wear to their class parties. This is what I decided I wanted my shirt to look like.
Design your t-shirt with your Studio software. I wanted to make my daughter's some cute Valentine's Day t-shirts to wear to their class parties. This is what I decided I wanted my shirt to look like.
One
of the most important things I learned when I was first working with my
Cameo was to print my design first. This is a great feature
that saves me tons
of mistakes. Here's how you do it.
Go to the Line Style window
(yellow arrow pointing up). Select All or whichever picture/letter/word you want to
print. Increase the line thickness a little bit (yellow arrow pointing to the right at the top) - I
usually go to 1.25. No reason why - just seems thick enough to see
well. I also change the color to red just because it shows up nicely.
Then, be sure to check the box at the bottom right that says Print Lines
of Selected Shapes (yellow arrow pointing to the right at the bottom). It took me forever to find this tiny little box but once I did, it completely changed how I used the software and Cameo machine.

Now
just click on the print icon and your shape will print. You can then
place it on the t-shirt to see how the size works etc. You may even
want to cut it all up to see how it looks. Like this...

This will save you TONS of
time and materials. If you're like me, you may have to
re-do it several times to get it right, but I love how it easy it is to
do that before making the final cuts.
After that, you're ready to cut! I wanted the flower in the middle to be fabric. So I ordered sewable fabric interfacing from Silhouette. They have simple directions included. Basically, I cut out a square of the fabric interfacing and held the iron on it.

Then I put it on my cutting mat and cut!

So very, very cool! Have I mentioned that my Cameo is my bestest best friend? I love her!
After cutting the shape, you iron it on to the shirt. There is some peeling of backings at some point in there but it's been several weeks since I did this step and I don't remember exactly. Like I said, the directions from Silhouette are very easy to follow. This just gives you the basic gist of it!


The next step is to give it to my mom...well, that wouldn't be the next step for you obviously...but since I can't sew, that was my next step. She took it and did the embroidery work around the fabric. Then she told me that next time I needed to find something a little less curvy. I didn't know - whoops! Actually, next time I'll get the kind of interfacing that does not require sewing. I chose this kind because it said you could wash the shirt. However, I have yet to need to wash the shirt because the girls have not worn them yet. And being holiday shirts, I don't anticipate them wearing them too much. Ummm...yeah, didn't think that one through very well.
Okay - after you get your shirt back...or sew it yourself because you're not a loser like me who does not know how to sew - it's time to paint the letters on.
So, I took some Silhouette stencil vinyl and cut out my letters. Then you weed out the part you don't need (is it called negative space, I think?) and just have the outline of the letters. This part makes my brain hurt! So bad! But fight through it. It's worth it and gets better from here, I promise.
 Use the transfer tape and put it down on the shirt.
 And then paint!! I used the sponge to paint the top letters and get a little bit of a rough look. I used the foam brush for the green at the bottom to get more coverage.

Once dried, peel up the stencil vinyl. And here's what you've got...

Okay - after you get your shirt back...or sew it yourself because you're not a loser like me who does not know how to sew - it's time to paint the letters on.
So, I took some Silhouette stencil vinyl and cut out my letters. Then you weed out the part you don't need (is it called negative space, I think?) and just have the outline of the letters. This part makes my brain hurt! So bad! But fight through it. It's worth it and gets better from here, I promise.


Once dried, peel up the stencil vinyl. And here's what you've got...

I think it's SOOOOO cute!! I'm going to add some fabric flower pins and they're ready to go for Tuesday. I'll be sure to post some pictures of the girls wearing them on Valentine's Day!
UPDATE: Here are my sweet Valentine's!!!

UPDATE: Here are my sweet Valentine's!!!

I'm linking up to Classy Clutter: Spotlight Saturday!


No comments :
Post a Comment