Wednesday, February 15, 2012

Valentine's Day Crafts Wrap Up

Did you have a good Valentine's Day?  We had a great one here at the Copycat Queen's castle!  We ordered pizza, ate lots of candy and then went on a walk.  It was a nice night outside.  Cool enough for us to need coats and to chill our cheeks but not uncomfortable.  All in all it was a really nice, relaxing family evening.

I made a couple of cute things for the kids.  The girls just took regular old Valentine's Day cards but I made cute gifts for their teachers.  I didn't get around to making teacher gifts for my son's preK teachers but I made cute Valentine's gifts for his friends.  I forced myself to be okay with not getting everything done that I wanted to - you know how it goes!

I got my inspiration for the teachers' gifts from Classy Clutter - the same place I got my inspiration for my Valentine's Wreath.  She does such cute stuff!!  This one is her DIY Valentine's Topiary Trees Tutorial. 

{Photo from Classy Clutter}

I made mine a little smaller.  A while ago I got some cute little buckets from the wedding section of the Dollar Store.  I also had cute little styrofoam balls.  When I saw these cute topiaries I instantly knew I could make a smaller versions for the teachers' desks.  I followed her tutorial - it was very easy!

Cut out about a yard of crepe paper.  Fold it in half and start rolling and rolling...

 And rolling!
 Cover the back with the end of the paper and glue. 

WARNING: You WILL burn your fingers with the hot glue!  Well...I did.  LOTS.  Maybe now I can pull off the perfect crime since I probably have no fingerprints left!


Then put some glue on the back.


And glue it to the styrofoam ball.


And repeat...rolling and gluing, rolling and gluing!


And here's the finished product!  I added straight pins with pink heads to fancy it up a little bit!


They turned out so cute!  I actually had some trouble getting it anchored into the buckets.  I was using floral foam (not sure if that's the correct name of it - that's what I call it!) and couldn't get it right.  My handy husband was able to cut the foam and make it work.  I love that he can always figure things out when I can't - we're a good team.  My daughter's kindergarten teacher said she hummed the wedding song while pretending to walk down the aisle like it was a wedding bouquet!  And she said she as showing it off to all the other teachers!  Fun!

The Valentine's I made for my son's class are from Zakka Life: It's a Plane...It's a Plane...It's a Super Valentine!!.  I just printed out her printable which included different color capes and masks.  I just cut the pieces out and put them on the lollipops!  The masks go on with tape and I punched holes in the capes and they stay on over the wrapper.


 Super cute and my little guy loved them!  I even had to make one for him!!


I hope you had a wonderful Valentine's Day!  What cute crafts did you make?  

Now...on to spring/Easter crafts!!

Saturday, February 11, 2012

UPDATE: Be Mine Valentines Day Silhouette Cameo T-Shirt Tutorial

This is my first tutorial! My main goal with this tutorial is to give you some tips on how to use your Studio software for Silhouette to make a shirt very easily.  These aren't monumental tips, however, they took me a while to figure out when I first got my Cameo and I would have loved to have had this information during some frustrating moments!  So here's what I came up with!

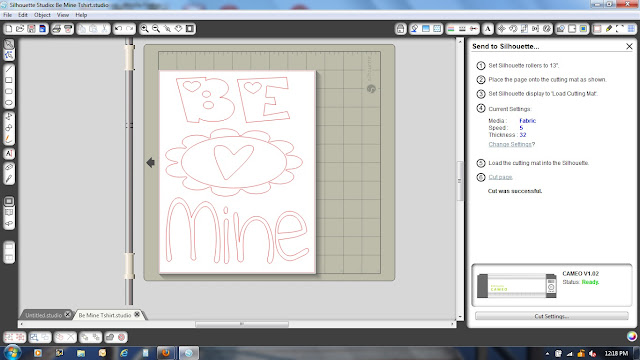
Design your t-shirt with your Studio software.  I wanted to make my daughter's some cute Valentine's Day t-shirts to wear to their class parties.  This is what I decided I wanted my shirt to look like.

One of the most important things I learned when I was first working with my Cameo was to print my design first.  This is a great feature that saves me tons of mistakes.  Here's how you do it.  

Go to the Line Style window (yellow arrow pointing up).  Select All or whichever picture/letter/word you want to print.  Increase the line thickness a little bit (yellow arrow pointing to the right at the top) - I usually go to 1.25. No reason why - just seems thick enough to see well.  I also change the color to red just because it shows up nicely.  Then, be sure to check the box at the bottom right that says Print Lines of Selected Shapes (yellow arrow pointing to the right at the bottom).  It took me forever to find this tiny little box but once I did, it completely changed how I used the software and Cameo machine.
Now just click on the print icon and your shape will print.  You can then place it on the t-shirt to see how the size works etc.  You may even want to cut it all up to see how it looks. Like this...


This will save you TONS of time and materials.  If you're like me, you may have to re-do it several times to get it right, but I love how it easy it is to do that before making the final cuts.

After that, you're ready to cut!  I wanted the flower in the middle to be fabric.  So I ordered sewable fabric interfacing from Silhouette.  They have simple directions included.  Basically, I cut out a square of the fabric interfacing and held the iron on it.  


Then I put it on my cutting mat and cut!

So very, very cool!  Have I mentioned that my Cameo is my bestest best friend?  I love her!

After cutting the shape, you iron it on to the shirt.  There is some peeling of backings at some point in there but it's been several weeks since I did this step and I don't remember exactly.  Like I said, the directions from Silhouette are very easy to follow.  This just gives you the basic gist of it!
The next step is to give it to my mom...well, that wouldn't be the next step for you obviously...but since I can't sew, that was my next step.  She took it and did the embroidery work around the fabric.  Then she told me that next time I needed to find something a little less curvy.  I didn't know - whoops!  Actually, next time I'll get the kind of interfacing that does not require sewing.  I chose this kind because it said you could wash the shirt.  However, I have yet to need to wash the shirt because the girls have not worn them yet.  And being holiday shirts, I don't anticipate them wearing them too much.  Ummm...yeah, didn't think that one through very well.

Okay - after you get your shirt back...or sew it yourself because you're not a loser like me who does not know how to sew - it's time to paint the letters on. 
So, I took some Silhouette stencil vinyl and cut out my letters.  Then you weed out the part you don't need (is it called negative space, I think?) and just have the outline of the letters.  This part makes my brain hurt!  So bad!  But fight through it.  It's worth it and gets better from here, I promise.
 Use the transfer tape and put it down on the shirt.
And then paint!!  I used the sponge to paint the top letters and get a little bit of a rough look.  I used the foam brush for the green at the bottom to get more coverage.

Once dried, peel up the stencil vinyl. And here's what you've got...


I think it's SOOOOO cute!!  I'm going to add some fabric flower pins and they're ready to go for Tuesday.  I'll be sure to post some pictures of the girls wearing them on Valentine's Day!

UPDATE:  Here are my sweet Valentine's!!!


I'm linking up to Classy Clutter: Spotlight Saturday!


And Thirty Handmade Days Pity Party

Thursday, February 9, 2012

Spray Painted Chalk Painted Distressed Furniture...Mishaps and Victories

Yes, the title is long and confusing.  Keep reading, you'll understand! 

In getting started in crafting and DIY, I've had many moments of frustration, self doubt, and downright being mad as all heckfire that I can't do anything right.  I sometimes feel like everyone else in blog land knows how to do everything right, the first time, perfectly.  I slowly came to the realization that this is not the truth.  But still, one of my goals of my blog is to show you all the ways I've messed up.  I want you to see the good, the bad and the ugly so that you won't get frustrated at your bad and ugly and so that you can celebrate your good! 

This is DEFINITELY one of those posts!  I am just getting started with furniture painting.  I don't even suggest that you'll learn anything from my post.  The only thing I want you to take away is the knowledge that if you're just starting out too...IT'S OK!!!  You'll get it - eventually!!  That and maybe learn a little bit from my mistakes!  With that said...laugh away at my idiocy!!

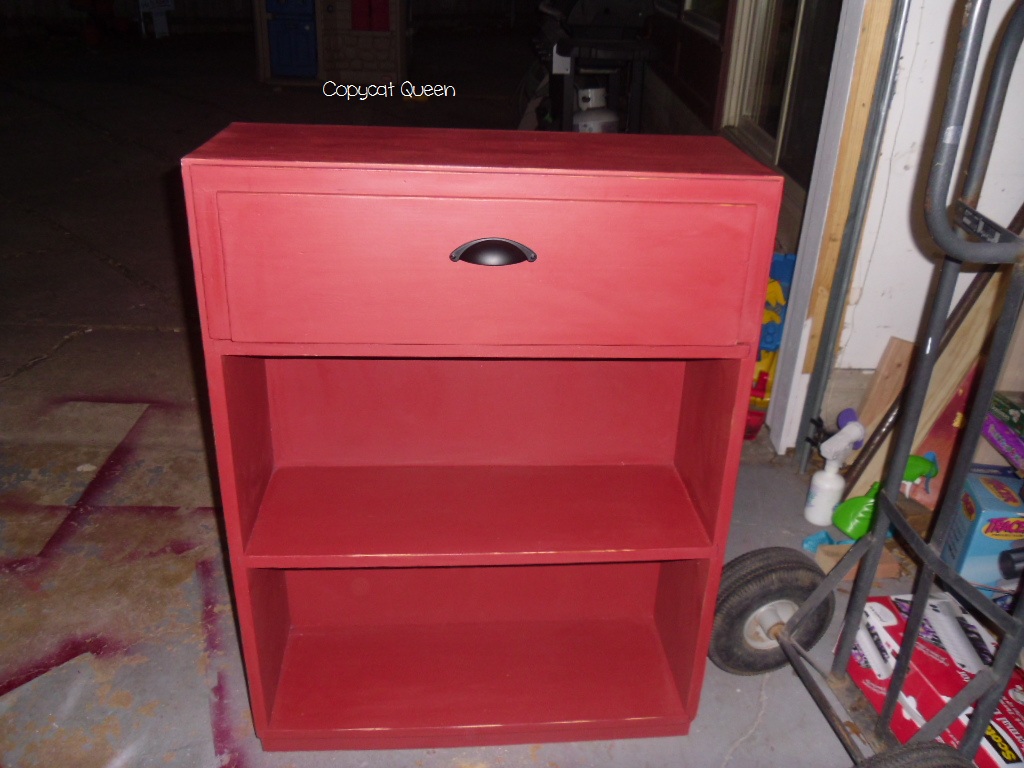
I've become obsessed with furniture painting. It all started with a piece that I have in my entry hall. It is a hand me down from my husband's family. They've had it a while. It is perfect for holding keys and junk (and believe me, a lot of "junk" ends up in there) but look at it - there isn't even a handle to open that top shelf!!

So I decided I wanted to spray paint it.  I started with primer.  All was going well.  I got two cans of the color I wanted - a kind of cranberry color. Not even close to enough - but more on that later. Let me tell you, it was tough spraying inside those interior shelves!  It would spray back in my face!!  Yuck!  I would blow my nose and...cranberry!  TMI?  Sorry!

But I kept at it.  It took me a long time due to weather, life, and a few mishaps that included me getting the wrong color paint when I realized that two cans wasn't nearly enough! 

Note to self...and my readers...write the color down BEFORE going to the store.  Or...take a picture on your cell phone in case you end up at a store for other things but the store happens to have spray paint so you decide to go ahead and get some since you're there but you hadn't planned on it and so you aren't exactly sure what color you need.

I finally got it all painted.  I always knew I wanted to distress it so I grabbed some of my very handy hubby's sandpaper and started rubbing away.  I had read a lot about it and had somewhat of an idea on how to do it.  However, what I did NOT realize, was that once I sanded away the spray paint, what was left was white primer.  So I'd try to sand through the primer to the wood...and would get some wood, but also some white primer surrounding the edges.

Note to self...and my readers...DO NOT spray paint white if you're going to distress and don't want white to show through.  Probably a DUH for most...not for me.

I was SO frustrated!  My husband thought it looked okay...I DID NOT. 

By this time it had been a couple of months a while and I had discovered the new phenomenon of Annie Sloan's chalk paint and was OBSESSED with painting something with it.  However, I had already spent a small fortune in spray paint by this point, not to mention all the time AND the fact that we'd been without our entry hall piece for a couple of months a while.  While reading up on the chalk paint I found this post from No Minimalist Here about making your own!

I tried it with the Plaster of Paris...guess what?  It worked great!  It went on smoothly.  I didn't do any sanding except for the edges where I wanted to sand off the white primer to avoid the problem I originally had.  Best yet, I got to pick the exact color I wanted instead of having to settle for the spray paint color which wasn't exactly what I originally wanted.  It was easy to distress and turned out just beautifully! 

I waxed it with Min Wax, added a handle, and put it back in the entry hall.  Between the garage and my hallway there is NO good lighting and I couldn't ever get a great picture of the whole thing so I'm posting several pictures that highlight different parts of it.


I think it turned out so pretty!  I wish I had better pictures.  Maybe I'll try to take some more.  Anyway, I hope you learned something and got some ideas on what you'd like to do with your own furniture projects!  And let me know if you do any of the make your own chalk paint and how it worked out for you!!

Wednesday, February 8, 2012

Valentine's Day Wreath

Whew!!  I'm finally getting a post up!  So excited!  I had such big plans for finishing tons of projects last weekend.  Buuuuut...you know how that goes.  Sometimes the kids and husband have other plans for our time don't they?

So I'm excited to have finally finished my Valentine's Day wreath.  It was a lot of fun to make.  I did a felt wreath based on a beautiful wreath that Classy Clutter made. She has a great tutorial on how to make it so go there to find out how.  I'll just show you how I made it my own.

I made tons of circles on the felt.  For some reason, I CANNOT cut circles very well so I have to have a template to cut from...even then I still have trouble with cutting circles. 
From there you fold the circle in half, then in half again, and then cut the corner off.  I don't have pictures of these steps but Class Clutter has a great tutorial.  Then you glue them on...and glue, and glue and glue! 
 Then I attached a ribbon...
And hung it on the door.  But, me being me, I wasn't happy with it.  It kept bothering me every time I'd come and go.  Something just didn't look right.
So then I remembered that I had some little wood hearts.  I dug them up and put some scrapbook paper on them with Mod Podge.  Sorry for the HORRIBLE pictures.  I'm realizing I am a very bad picture taker - especially when I'm doing it in kind of a hurry.
Hot glue gun and some rick rack and... TaDa!!!  Now, that's it!!  I love it!!!  And when I was in the car this morning taking the kids to school I glanced up and saw it from the street and it was so cute from far away too!!

Hope you got some good ideas or inspiration for your own wreath!! Linking up with:
HookingupwithHoH

Saturday, February 4, 2012

It's A Valentine and Bug Crafting Weekend


I'm SO glad it's the weekend.  I have tons of projects to work on because my husband and I will be putting on a marriage retreat for our church next weekend.  That means I need to finish all Valentine's Day gifts done this weekend - ACK!!!  And I can't wait to share them with you when they're done!!

Oh - and I have a Valentine's Day t-shirt tutorial coming soon.  My first tutorial!  How fun!

For now, I'm waiting on my hubby to get home with some breakfast and doing a little craft kit with my middle child - my artist and fellow crafter! I got her a little craft kit that has all the materials you need to make several different cut little bugs with paper plates and stickers and buttons. They are quite adorable!


What a fun way to start a Saturday morning!!


Friday, February 3, 2012

Wood Block Christmas Gifts

I posted the wood blocks I have for sale in my Etsy shop yesterday.  I have really fallen in love with doing wood block crafts.  I started with this one. 

I got the idea from this amazing set of blocks on Pinterest.  Do you Pin?  I LOVE Pinterest!!

From there, I decided to try my hand at making more for Christmas gifts.  I had just gotten my new Silhouette Cameo - my bestest best friend - and learned A LOT about my machine by doing these blocks.
I made this one for my sister in law.  She babysits for us at least once a month - for FREE!!  We are so blessed!!  My kids LOVE when Aunt Kelley comes to babysit!!  So I wanted to give her something very special to let her know how much we appreciate her!  The reindeer picture is an old Christmas card that I thought was so cute and never threw away.  I knew it would make a cute craft at some point and finally figured out what to do with it!  Sorry for the blurry picture.  I was just trying to capture it before I gave it to her and the lighting was bad. 

 These are the gifts I made my parents and my in-laws.


The pics are TERRIBLE!!  I wasn't expecting to post them to a blog or I would've done a better job.  I was just trying to remember my work!

I made this one for my sister.  She also does a lot of babysitting for us.
The backing is a canvas painted green.  Then I took some wood pieces from a wooden nativity set from a stash of stuff that I got from a bunch of stuff that my mom found when cleaning out my grandmother's house after she passed away.  I love that I was able to use her stuff to make a special gift for my sister.  It seems like it makes it that much more meaningful.  I also added a star to the top but am not sure why I didn't get a picture of it!

This last picture is my dining room table while working on all of this stuff - Santa's workshop if you will!!  


It's also proof that...I NEED A CRAFT ROOM!!!

I had a lot of headaches in making these presents but like I said, I learned a lot too.  I hope it gives you some inspiration and ideas for making some wood block crafts for yourself.  I've got some fun plans for Easter blocks swimming through my head and can't wait to start on them!!

Thursday, February 2, 2012

My Etsy Shop

I opened an Etsy Shop! The name is Stitchcat's Stuff.  Stitchcat has been my username for ever and ever.  I used to be really into cross stitch and...well, cats!  I haven't changed it in about 20 years so it makes sense to be the name of my store.  I'm not sure if that will be confusing - maybe I should make the name Copycat Queen?? 

Hmmm...we'll see.

Right now I only have two items listed.  They are both Valentine's Day wood block decorations.  I have been using painted 2x4 blocks of wood.  After distressing the wood, I decoupage scrapbook paper to the blocks and then cut vinyl letters out with my Silhouette Cameo - my bestest best friend in the world. 

I have some plans for some Easter blocks but am kind of testing the waters right now with the Valentine's blocks.  I may have listed them too late though.  Honestly, I was scared to jump in.  But the other day I just said, what the heck!!  Why not just try.

I'll keep you updated on the haps with my store in case you've been thinking about doing something similar!!