I changed the name of this blog. Yes, I'm still the copycat queen. I always will be!! But...my Etsy shop's name is Stitchcat's Stuff. Stitchcat is a name I've used for my email forever. I used to love to cross stitch and I used to have a cat so at some point that became a user name and from there it has just stuck!! Funny because I don't cross stitch any more - although I have a bunch of unfinished projects up in my craft closet - and I don't have my cat either. Oh well!
I think it will provide more continuity to my Etsy endeavors to have the names the same and it just feels more natural to me. Hopefully it will inspire me to actually post more! I know with summer coming up that it will be a lot easier and next year I'll have all 3 kids in school - I'm sure there will be quite a few posts about that adventure - and hopefully that will free up some time as well. Until then, I'll just keep doing what I can do!
I have some fun things I've been working on and can't wait to share them!
Until then...have a wonderful first day of spring!
In honor of my blog's new name...I'm providing a coupon code for free shipping to any US address for my Etsy store. Just enter NEWNAME when it asks for a coupon code!
Wednesday, March 20, 2013

Tuesday, January 29, 2013
How to Cut a Felt Circle without a Die Cutter
Can you cut circles? I can't. I am a terrible cutter. Maybe I was sick that day in PreK or something but I can't cut a smooth, clean straight line, circle or anything else for that matter. This causes trouble for someone who LOVES to do felt ruffle wreaths...and many other crafts. It's also slightly embarrassing to admit being that I'm a PreK handwriting/fine motor teacher who teaches kids how to cut! I know the mechanics of how to do it, and how to teach it, but that doesn't mean my execution is any good! Oh well! Here I go...my felt circle cutting.

Is that the worst you've ever seen? I told you...embarrassing!
Besides that, I am impatient and hate how long it takes to cut all the circles I need to make a felt wreath - but I endure it because the rest of making the wreath is SO fun! Plus it hurts your fingers!! Waaaa!
I started thinking that there just HAD to be some sort of tool to cut circles out of felt. I tried with my Silhouette and it can be done but it ruins your blades and you need to put a special fabric liner on the felt that doesn't look good when you're making it into a wreath. So I hit the craft stores and found this...
OLFA 1057028 CMP-3 Rotary Circle Cutter

I LOVE THIS TOOL!!!
Look at my circles now!


Isn't that amazing? And it's SO easy!! If you love felt crafts, run and out and get this NOW!
Look at all of these circles I cut!!

I went a little crazy!
Now, I will say, you can still make a cute wreath with horribly cut circles...it just takes WAY longer. I just made this wreath for my Etsy store with circles like the first one I showed you. BUT...I had to trim EACH one before I glued it on and it took FOR...EVER.

I'm about to make another spring wreath. I can't wait to use my new tool and make perfect circles super quickly!!
Is that the worst you've ever seen? I told you...embarrassing!
Besides that, I am impatient and hate how long it takes to cut all the circles I need to make a felt wreath - but I endure it because the rest of making the wreath is SO fun! Plus it hurts your fingers!! Waaaa!
I started thinking that there just HAD to be some sort of tool to cut circles out of felt. I tried with my Silhouette and it can be done but it ruins your blades and you need to put a special fabric liner on the felt that doesn't look good when you're making it into a wreath. So I hit the craft stores and found this...
OLFA 1057028 CMP-3 Rotary Circle Cutter
I LOVE THIS TOOL!!!
Look at my circles now!
Isn't that amazing? And it's SO easy!! If you love felt crafts, run and out and get this NOW!
Look at all of these circles I cut!!
I went a little crazy!
Now, I will say, you can still make a cute wreath with horribly cut circles...it just takes WAY longer. I just made this wreath for my Etsy store with circles like the first one I showed you. BUT...I had to trim EACH one before I glued it on and it took FOR...EVER.
I'm about to make another spring wreath. I can't wait to use my new tool and make perfect circles super quickly!!
Monday, January 28, 2013
Hello Stranger
Well...actually, I'm the stranger. I guess the title should be Hello FROM A Stranger. I know it's been a while. I got blog and crafted out a little while back ago. I'm refreshed and have been crafting again. So, naturally, I feel like blogging again because it's fun to show off what we do!
Maybe it's Valentine's Day, or just having actual time to myself again after the craziness of the holidays when I don't have any time at all, but something about this time of year just causes me to want to get my craft on!
So, I've been working on some wreaths. One day when it was grey and dark and dreary outside I just got inspired to make a brightly colored wreath for my door. I think I was in wreath mode this time last year too when I made this Valentine's Day wreath. That was a felt ruffle wreath. This year I decided on a fabric rag wreath. I had never made one before...it was SO fun!! Here's what I made.
So, now I'm addicted to rag wreaths. I made this one to sell in my Etsy store (see the link on the sidebar to visit my shop).
Isn't it gorgeous? I can hardly stand to let it go!
.JPG)
.JPG) So then I had a bunch of fabric left over but didn't think I had enough to make another wreath so I made a matching garland for my Etsy Store too.
So then I had a bunch of fabric left over but didn't think I had enough to make another wreath so I made a matching garland for my Etsy Store too.


 So much fun! I love the colors! Perfect for Valentine's Day and well into spring!
Now I have fabric for another one - a lot more spring colors. But I'm finishing a felt ruffle St. Patrick's Day wreath!
Arrrggghhhh - wreath mania!!
I can't wait to show you my fabulous new tool I got for my felt ruffle wreaths. I'll try to post that in the next day or two!
Maybe it's Valentine's Day, or just having actual time to myself again after the craziness of the holidays when I don't have any time at all, but something about this time of year just causes me to want to get my craft on!
 | |||
| Fabric Rag Wreath |
So, now I'm addicted to rag wreaths. I made this one to sell in my Etsy store (see the link on the sidebar to visit my shop).
Now I have fabric for another one - a lot more spring colors. But I'm finishing a felt ruffle St. Patrick's Day wreath!
Arrrggghhhh - wreath mania!!
I can't wait to show you my fabulous new tool I got for my felt ruffle wreaths. I'll try to post that in the next day or two!
Monday, August 20, 2012
Grub It Down Wood Sign

I LOVE wood signs and wood projects. I am always drawn to any pictures of them I can find. I have a wood crafts board on Pinterest to help spark ideas.
At the beginning of the summer I started painting my dining room from the tannish color that was on the walls when we moved in to a light yellow. It's so fresh and fun! I LOVE the change! I've wanted to have a kind of rustic looking wood sign in my dining room and now with my new dining room - it was the perfect time to work on it.
I thought long and hard about what I wanted it to say and one day it came to me - the perfect thing for OUR family was this...

Grub it down is phrase that my husband has used ever since I first met him 16 years ago! If I would say, "I'm hungry" he might say, "Grub it down!" So lately our kids have picked it up. It's so cute to hear them say Grub It Down! So I knew that had to be our sign. I love that it is so personal to us.
So hubby got some wood, cut it down and nailed it together for me. Isn't he sweet? We're such a good team that way! Then I used my Silhouette Cameo to cut stencils out of contact paper and painted away!! When I finished painting I sanded over it a little bit to make it look more distressed and then sprayed a clear Mod Podge Clear Acrylic Sealer.
It looks so cute in our dining room. Here are a couple of views of it.

Sorry for the hanging light in the middle of the picture but there is no way to get a wide view of the sign without it there!

We love looking up at our Grub It Down Sign when we sit down to eat family dinner!
Linking to the parties on the sidebar and:
Made By You Monday
Motivate Me Monday
Terrific Tuesday
Thursday, August 16, 2012
Towel Hooks and Chore Charts: Organization with Cameo


My mother-in-law has a little booth in a gift shop in the town where she lives. Her booth does really well but every once in a while she has certain items that won't sell for some reason. Sometimes she gives them to me so that I can do something with them like these towel hangers.


I had no idea what to do with them when she gave them to me so they sat in a closet for a while. Recently, my kids were given some adorable personalized towels. Up to that point we had been using the ONE towel hook that we had in our bathroom and had been successfully using with the 3 little baby towels that they were STILL using! It became quickly obvious that the one hook wasn't sufficient! I immediately knew I could use the "His" towel hooks!
So I taped off the hook part and spray painted the rest white. I got out my Cameo and cut their initials out in "their" colors in vinyl. My kids are color coded by the way. One likes green, one likes pink (or in this case I had purple - close enough and acceptable to her!), and one likes blue. It has turned out that I can usually find one of each color in whatever "thing" I'm buying and it helps to keep everything separate. I slapped the vinyl on and hung the towel hangers up! Easy Peasy!
Instead of everything on this...
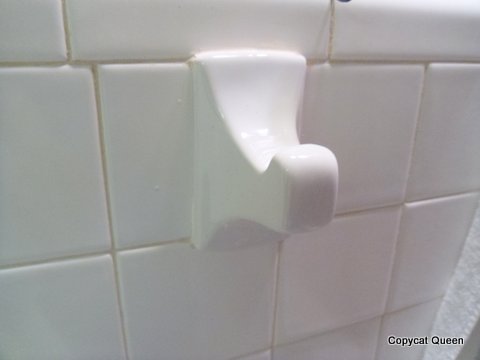
They're on these...

WOW - I really need to change that light cover!! Amazing what you notice when you take pictures for your blog!
Next up...chore charts! I found these magnetic boards at Tuesday Morning in the clearance section. I wasn't crazy about the bamboo look but I knew I could use them for the kids rooms somehow and I also knew I could do something about that bamboo look! I forget how much they were but they were super cheap and a good deal off of what they originally were so I grabbed them up!

For a while I've been using some laminated pre-printed chore charts that worked well but I just wasn't crazy about them. The kids had gotten kind of bored of our system and weren't doing their chores as much. Plus with school coming up, I knew I had to get organized about the morning rush as well as get them excited about doing their morning routine so we can get out the door quickly. So I knew these boards would be perfect!
So, I got out my Mod Podge...

and slapped some scrapbook paper on - color coded of course!
Next, I used my Cameo to cut out some 3x4 life library pocket. Then some labels - sorry, I couldn't find a link to the ones I used. I cut the labels out of chalkboard vinyl. I put each one on a library pocket and then used the magnets that came with the magnet boards to hang them. I had ordered a chalkboard marker and used that to write each chore down. Last I just painted some popsicle sticks white and then hot glued some ribbon around the edge of each board. So, each time the kids complete a chore, they put a popsicle stick in the appropriate pocket. At the end of each day, I mark down that they have done all their chores. I have another little dry erase board for the daily tally. At the end of the week, if they have 7 tally marks, they get their allowance.

I hope these have given you some organization inspiration. My Cameo just makes everything I do cuter, faster and way more fun. Now if it could just clean out my closet for me!!!
Linking up to blogs listed in the sidebar as well as:
Making the World Cuter
Silhouette Blog
Saturday, July 28, 2012
ADD Day
I have SO many crafts and projects that I really WANT to do - I
do!!! But I am SOOOOOOOOOOOOOO ADD today. I can't concentrate at all.
Uggghhhh!!!
What do you do to stay on track?
What do you do to stay on track?
Thursday, July 26, 2012
Mailing Tube Vase Fillers

I did some work on my mantel and I wanted to share a neat trick I used to fill vases - and tell you the mistake that I made that I can't fix now but hope that no one really notices. I had these two HUGE vases that I wanted to fill with beans/peas and a candle but...I didn't want to buy TONS of beans and peas.


I dug out my container and cut it in half. But...do you see below where I went wrong? I see it now, but didn't then. Notice the difference in the heights of the tubes! Uh oh! I'll point that out more specifically in a minute.

What is cool is that each end has a cap so I didn't have to stuff anything down in the middle to keep the beans from going down in there.
 |
| Add caption |
I filled each one with the white beans first and then the split peas. I was oh so careful to get it all equal...but remember the difference in the tubes? One is higher than the other. Didn't realize it until all the beans where in. Now there is no way to fix it without having to pour out the beans which would mean separating all of the beans. Um, no, thanks. I'll wait until I refill it this fall and then cut the container to the right size.
In the overall scheme of things I don't think anyone would notice. I don't think people are in the habit of staring at my mantel the way I was doing when I was just looking over the craft I had done. All in all, I'm really happy with the way it looks!! (Oh, I've since taken the red lantern off - it didn't look right. But I'm too lazy to go take a new picture right now - haha).
 |
| Mantel with vases and vase fillers |
I just love these vases and can't wait for fall and Christmas to change them up again!!
Subscribe to:
Posts
(
Atom
)