
Friday, February 24, 2012

Thursday, February 23, 2012
Pink and Green Birthday Party
The past several years I've done the kids' birthday parties at home. Been there, done that...I'm over it. This year I really wanted to have them somewhere else. We decided to combine our daughter's birthday parties this past year. One was born in November and one on New Year's Eve. It is such a busy time of year and it's always tough to get the parties scheduled. Since the girls' friends all know each other from Adventure Princess, we decided it would be fun to have all of them at once. Plus it ended up being way cheaper that way!
Big Bear loves green and Me Too loves pink or purple. So it was pretty easy to decided on a pink and green theme.

Marshmallow pops - dip big marshmallows in candy melts and then add sprinkles! I found the cute little box at Hobby Lobby. I wasn't sure what I would do with it but when I couldn't figure out how to display the marshmallow pops I knew this was the perfect way to use it!


Big Bear loves green and Me Too loves pink or purple. So it was pretty easy to decided on a pink and green theme.

Marshmallow pops - dip big marshmallows in candy melts and then add sprinkles! I found the cute little box at Hobby Lobby. I wasn't sure what I would do with it but when I couldn't figure out how to display the marshmallow pops I knew this was the perfect way to use it!

Big Bear's green side


Me Too's pink side.


Most of my inspiration for the crafts you see are from...where else...PINTEREST!!! Best place EVER!!
The puff balls turned out super cute I think - even though the pink one is kind of sideways. I found this craft here. They are super easy and fun to make - check out her tutorial. It's just cupcake liners on a Styrofoam ball.


The G & the K were also super fun to make. I found the little balls at Hobby Lobby a long time ago and knew they'd be adorable super glued onto chipboard letters. I had tons left over so I put them in some little glass votive holders that I bought at the Dollar Store several years ago and super glued ribbon to them. I stuck a little flickering candle light that I had gotten from the Dollar Store long long ago when preparing for Me Too's Rainbow Birthday Party.


I forget where I got the idea to do the popcorn for the goody bags. It was sometime after a failed attempt at melting crayons into shapes with cookie cutters. I don't know how people do that...I've read tutorial after tutorial and blog post after blog post and can't make it work for me.
Anyway, the popcorn baggies turned out cute but WAAAAYYYY more expensive than I expected - long story but it had a lot to do with my not being either smart nor able to speak up when things go wrong. That's another blog post for another day when I feel like spouting off.
Anyway, the popcorn baggies turned out cute but WAAAAYYYY more expensive than I expected - long story but it had a lot to do with my not being either smart nor able to speak up when things go wrong. That's another blog post for another day when I feel like spouting off.

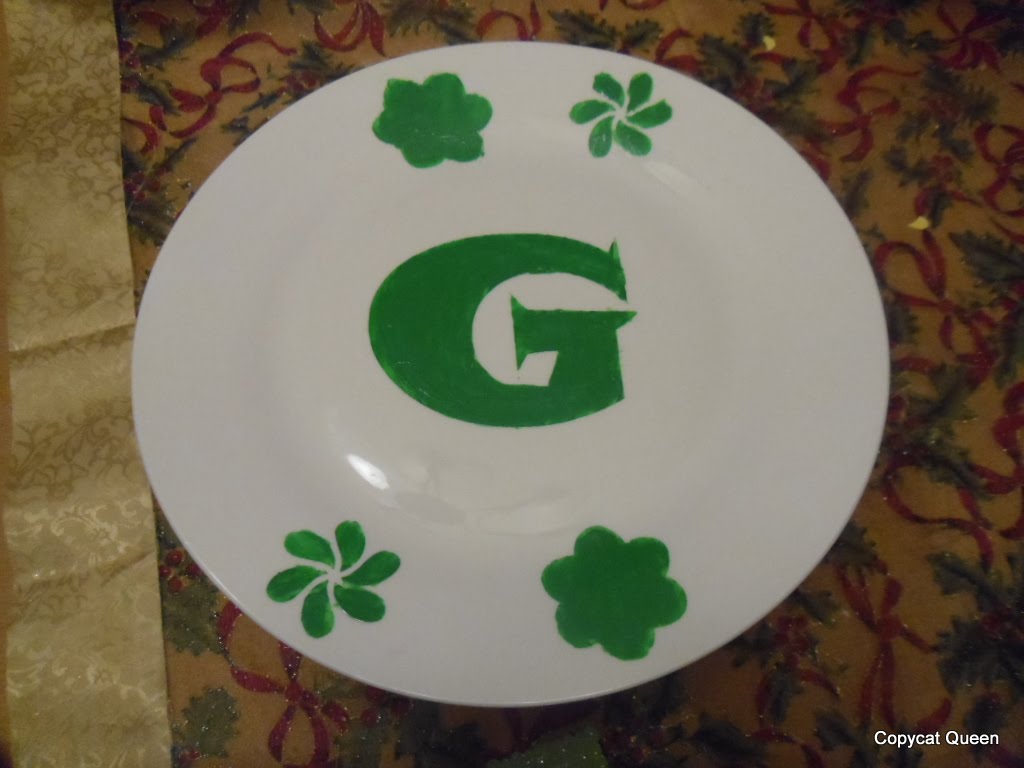

Last are my cupcake stands. I painted these Dollar Store plates using stencils that I made with my fun fun toy...my Silhouette Cameo!! I super glued them to a candle holder that I spray painted white. I LOVE LOVE LOVE how these turned out.
I LOVE LOVE LOVE how it all turned out.
And the kids had a blast. They have such sweet friend with such sweet families.


Hope you enjoyed our pink and green birthday as much as we did!!
Wednesday, February 22, 2012
Crown of Thorns and Mardi Gras
In my first post on this blog, I mentioned that I have another blog where I post things about religion, family, and other things. I want this blog to be all about crafting, DIY and home decorating stuff. But...my faith is a BIG part of my life and inevitably it is going to be a part of my crafting, DIY and home decorating. So...it's going to show up here from time to time! This is one of those times!
Today is Ash Wednesday - the first day of Lent. Today we attend mass and get our little smudge of ashes, abstain from meat and fast. We do all of this in preparation for the next 40 days where we will focus on Christ's suffering, sacrifice, and ultimate death upon the cross. I am always trying to find ways to make these church seasons and the activities that we do more real for my kids.
I have wanted to try and idea I've seen for the past couple of years which involves making a crown of thorns out of dough with toothpicks sticking out of it. Every time someone does a good deed, they can remove a toothpick to symbolize lessening the pain on Jesus' head from the thorns. There are tons of great ideas out there on how to make the crown. Some are very complicated dough recipes, some are easier. All are more than I have ever wanted or had time to do and my ADD makes it really hard for me to follow recipes. But this year I found a great idea for how to make the crown that even I could handle doing! I found this on Catholic Icing: How to Make an EASY (and cheap) Crown of Thorns for Lent. She uses dollar store play dough, mixes it all together to make it brown, and then twists it into the crown of thorns. See how beautiful hers is?

I decided that even I could handle this one! I was wrong!!
I got the play dough and divided it up amongst the kids and told them to start mashing them together. This is the part I missed:

The kids smushed and mushed the play dough all around. They actually got tired pretty quickly though and guess who ended up doing a lot of it?

 But it finally got done. We rolled pieces of play dough out into long snakes and then twisted two together. I actually piled two on top of each other to make it a little thicker. We decided just to do on big family crown of thorns instead of one for each kid like Catholic Icing did. Finally, after lots of mushing, rolling and twisting, we had a crown! It might not be brown but we think it looks pretty good!
 The kids have had a good time doing good deeds so they can take a toothpick out!
We also decided to have a little Mardi Gras fun! I made purple, green and yellow pancakes for dinner!
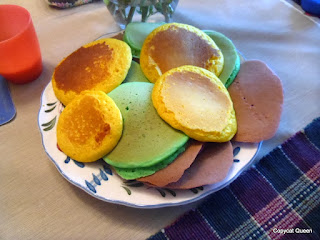 The batter looks so pretty. Then you put it on the griddle and it browns the outside making it look a little dull. But they still taste like pancakes!!
Did you do anything fun for Mardi Gras? Are you doing anything special for Lent?
Today is Ash Wednesday - the first day of Lent. Today we attend mass and get our little smudge of ashes, abstain from meat and fast. We do all of this in preparation for the next 40 days where we will focus on Christ's suffering, sacrifice, and ultimate death upon the cross. I am always trying to find ways to make these church seasons and the activities that we do more real for my kids.
I have wanted to try and idea I've seen for the past couple of years which involves making a crown of thorns out of dough with toothpicks sticking out of it. Every time someone does a good deed, they can remove a toothpick to symbolize lessening the pain on Jesus' head from the thorns. There are tons of great ideas out there on how to make the crown. Some are very complicated dough recipes, some are easier. All are more than I have ever wanted or had time to do and my ADD makes it really hard for me to follow recipes. But this year I found a great idea for how to make the crown that even I could handle doing! I found this on Catholic Icing: How to Make an EASY (and cheap) Crown of Thorns for Lent. She uses dollar store play dough, mixes it all together to make it brown, and then twists it into the crown of thorns. See how beautiful hers is?
I decided that even I could handle this one! I was wrong!!
I got the play dough and divided it up amongst the kids and told them to start mashing them together. This is the part I missed:
(Because blue is such a strong color, you might only need to add half the can of blue. Try half first- you can always add more.) The basic concept behind mixing brown is mixing all 3 primary colors (red, yellow, and blue).We added the blue and we got more of like a greyish greenish color.

The kids smushed and mushed the play dough all around. They actually got tired pretty quickly though and guess who ended up doing a lot of it?


We also decided to have a little Mardi Gras fun! I made purple, green and yellow pancakes for dinner!

Did you do anything fun for Mardi Gras? Are you doing anything special for Lent?
Creativity Corner
I've been thinking a lot lately about creativity - where it comes from, how to get it, how to foster it. My mother-in-law has actually inspired this line of thinking. She encourages me to just keep working at my crafting and says it's important to keep the creative juices flowing.
I found a neat post today called Don't Wait For Inspiration that basically said not to wait for inspiration or an idea to come to you but just get to work doing something and the inspiration will come from the action itself.
Inspiration is absolutely unnecessary and somehow deceptive. You feel like you need this great idea before you can get down to work, and I find that’s almost never the case.Read the rest here. I actually went on to read some about the artist who said this and he's pretty interesting.
This is so true. It struck me that I wait for inspiration a lot before doing anything. Often I wait and wait and wait and wait for inspiration or an idea and when it doesn't come I decide I'm not good at doing the thing I'm wanting to do and then give up. I think that is something I like about crafting - especially in the era of Pinterest.

And why I am okay with being a copycat. Especially seeing that I am the Queen! I don't have to wait for inspiration. I can just look at something someone has done and start working. Usually as I get started, ideas start flowing as to how I want to change it a bit to make it a little more my own. Rarely do I completely copy what someone has done.
I think the more crafts that I get under my belt, the more I'll start to come up with original ideas on my own. I have already done that with my decorative blocks. In fact, I'm almost done with a few for Easter and Spring. I'm so excited to show them to you and to get them put up for sale in my Etsy store.
So what about you? Do you wait for inspiration? Or just start working? How do you feed your creative side?
Saturday, February 18, 2012
Paper Plate Flower Tutorial: Guest Blogger...
Time for the guest blogger reveal. The guest blogger is...

My 6 year old daughter, Me Too! Her blog nickname is Me Too because, being the middle child, she is always wanting to do what everyone else is doing. Me Too is an amazing child. She is bright, sweet, loving, and creative. And...very artistic. She is ALWAYS coloring or doing some sort of art or craft. In fact you've already seen her doing crafts in this post from a couple of weeks ago - and I just noticed she's wearing the same outfit! Guess we need to go shopping. She has loved rainbows for as long as I can remember. We've had a couple of rainbow birthday parties for her! All of her teachers comment on how much she loves to color. Not only how often she colors...but how many colors she uses in each picture. In fact, I was talking to her teacher from when she was 2 turning 3 and that teacher still remembers how long Me Too would take coloring and how many different colors she would use.
One night at dinner, Me Too began describing a craft she wanted to do. She wanted to turn a paper plate into a flower. She told us step by step how she would do it - coloring the plate, making the petals, painting a wood stick for the stem, etc. I asked her where she had seen this craft. She said that during dinner she started looking at the paper plate we were eating on (it was one of those days) and thought about how it looked like the middle of a flower and it just came to her. My husband and I were pretty blown away at her creativity. It was a weird feeling to experience envy at my own daughter! Here I am with a blog all about how I don't come up with original ideas but copy others and make them my own, and my daughter is coming up with a completely original idea. Not that this hasn't been done before, but in her world it hasn't! I knew right then and there that it would be super fun to do a tutorial for her idea and post it on the blog.
Okay - enough gushing...now on to the tutorial!
Here are our supplies. The only thing we forgot in the picture is glue. You'll need:
A paper plate, markers, paper, scissors, glue, a stick, green paint. We also ended up making some leaves to attach to the stem that we hadn't originally thought of so you'll also need some green paper.

These are Me Too's step by step directions.
Step 1: Color the plate

Step 2: Draw the petals on a white piece of paper.

Step 3: Cut the petals out

Step 4: Color them in! This was Me Too's 2nd favorite step. You'll see #1 in a few steps.


Step 5: Glue the petals on.

Step 6: Paint the wood stick that will be the stem. THIS was Me Too's favorite step. Who doesn't love painting?

Step 7: Attach the stem to the flower.

Here's the flower part. Kind of a mix of flowers here but adorable!


My 6 year old daughter, Me Too! Her blog nickname is Me Too because, being the middle child, she is always wanting to do what everyone else is doing. Me Too is an amazing child. She is bright, sweet, loving, and creative. And...very artistic. She is ALWAYS coloring or doing some sort of art or craft. In fact you've already seen her doing crafts in this post from a couple of weeks ago - and I just noticed she's wearing the same outfit! Guess we need to go shopping. She has loved rainbows for as long as I can remember. We've had a couple of rainbow birthday parties for her! All of her teachers comment on how much she loves to color. Not only how often she colors...but how many colors she uses in each picture. In fact, I was talking to her teacher from when she was 2 turning 3 and that teacher still remembers how long Me Too would take coloring and how many different colors she would use.
One night at dinner, Me Too began describing a craft she wanted to do. She wanted to turn a paper plate into a flower. She told us step by step how she would do it - coloring the plate, making the petals, painting a wood stick for the stem, etc. I asked her where she had seen this craft. She said that during dinner she started looking at the paper plate we were eating on (it was one of those days) and thought about how it looked like the middle of a flower and it just came to her. My husband and I were pretty blown away at her creativity. It was a weird feeling to experience envy at my own daughter! Here I am with a blog all about how I don't come up with original ideas but copy others and make them my own, and my daughter is coming up with a completely original idea. Not that this hasn't been done before, but in her world it hasn't! I knew right then and there that it would be super fun to do a tutorial for her idea and post it on the blog.
Okay - enough gushing...now on to the tutorial!
Here are our supplies. The only thing we forgot in the picture is glue. You'll need:
A paper plate, markers, paper, scissors, glue, a stick, green paint. We also ended up making some leaves to attach to the stem that we hadn't originally thought of so you'll also need some green paper.

These are Me Too's step by step directions.
Step 1: Color the plate

Step 2: Draw the petals on a white piece of paper.

Step 3: Cut the petals out

Step 4: Color them in! This was Me Too's 2nd favorite step. You'll see #1 in a few steps.


Step 5: Glue the petals on.

Step 6: Paint the wood stick that will be the stem. THIS was Me Too's favorite step. Who doesn't love painting?

Step 7: Attach the stem to the flower.

Here's the flower part. Kind of a mix of flowers here but adorable!

I had an a little Terracotta pot so I painted it pink and put the flower in it. We also realized we needed leaves for the stem so we cut some out and attached them. Here she is with the finished product!

I hope you've enjoyed this tutorial on how to make a paper plate flower. If it inspires you to make something, please send Me Too and I a picture of your creation!
Friday, February 17, 2012
Stay Tuned...Special Guest Blogger Coming
I am so excited! Another first at the Copycat Queen!
A special guest blogger will be joining me very soon with a tutorial for an original craft that she designed!
I'll tell you a couple of things about this guest blogger.
A special guest blogger will be joining me very soon with a tutorial for an original craft that she designed!
I'll tell you a couple of things about this guest blogger.
- She is very artsy crafty. More often than not you'll find her busy with some artistic project or another.
- Unlike myself, she is able to come up with original material - such as the craft we'll be highlighting.
- She specializes in children's projects.
- I am VERY proud to be associated with her and that she is allowing me to publish her work!
Thursday, February 16, 2012
Felt Fabric Flower...With A Surprise Inside
I have been obsessed with fabric flowers of all sorts. I have been pinning fabric flower tutorials and ideas to my Fabric Flower board.
One of the first tutorials I found was from Make & Do Girl. I loved the look of the flowers, the colors and the beautiful jewels in the middle. There is even a template to use! I knew I had to try it.
My first attempt...not so great.
 My kids and husband were cracking up. They're soooooo supportive. NOT!
I knew I could do better.
 And I did!!
So next was to find a cute little something for the middle of the flower. I searched and searched. I couldn't find anything I liked. When I would find something I liked it would end up being too expensive.
One day I was browsing JoAnn's and ran across Mod Podge Dimensional Magic . I've dabbled a little in Scrabble tile necklaces so I was interested in how this product worked. It also gave me an idea - I could make my own! I tried Mod Podging scrapbook paper to cardboard but that didn't work and covering it with the dimensional glue but it didn't work so well. One evening I was opening a bottle of wine and...ding, ding, ding!! A wine cork! I cut a small piece of a cork.

Cut out a piece of scrapbook paper and used regular Mod Podge to paste it on.

After it dried, I used the Mod Podge Dimensional Magic. The important step to take when using this type of product is to get the bubbles out first. Holding it upside down, squeeze a few drops out to remove the first drops which contain the bubbles. Also have a toothpick nearby - you can use it to push any bubbles that might come out to the side.

Then just fill the entire circle with the Mod Podge. It will look all milky but once it dries it's clear as day. Hot glue it into the middle of the flower.

Next I hot glued a pin to the back.

And here's how it turned out...

I love it!! I wore it with this shirt when we went on our retreat last weekend.

It was a hit!! Okay...go make flowers!!!
One of the first tutorials I found was from Make & Do Girl. I loved the look of the flowers, the colors and the beautiful jewels in the middle. There is even a template to use! I knew I had to try it.
My first attempt...not so great.

I knew I could do better.

So next was to find a cute little something for the middle of the flower. I searched and searched. I couldn't find anything I liked. When I would find something I liked it would end up being too expensive.
One day I was browsing JoAnn's and ran across Mod Podge Dimensional Magic
. I've dabbled a little in Scrabble tile necklaces so I was interested in how this product worked. It also gave me an idea - I could make my own! I tried Mod Podging scrapbook paper to cardboard but that didn't work and covering it with the dimensional glue but it didn't work so well. One evening I was opening a bottle of wine and...ding, ding, ding!! A wine cork! I cut a small piece of a cork.
Cut out a piece of scrapbook paper and used regular Mod Podge to paste it on.

After it dried, I used the Mod Podge Dimensional Magic. The important step to take when using this type of product is to get the bubbles out first. Holding it upside down, squeeze a few drops out to remove the first drops which contain the bubbles. Also have a toothpick nearby - you can use it to push any bubbles that might come out to the side.

Then just fill the entire circle with the Mod Podge. It will look all milky but once it dries it's clear as day. Hot glue it into the middle of the flower.

Next I hot glued a pin to the back.

And here's how it turned out...

I love it!! I wore it with this shirt when we went on our retreat last weekend.

It was a hit!! Okay...go make flowers!!!
Subscribe to:
Posts
(
Atom
)